Nie&Gao
Anyway, life is elsewhere and we all know it.

「Nginx」
写在前面
本文是陶辉的«深入理解Nginx»和tengine的读书笔记。 主要是对自己开发Nginx一个最简单的HTTP模块demo的总结。之前在网上也看了些相关技术贴, 发现几乎都没有给出了完整的,编译没有报错的示例。有别于其他,本文贴出完整代码示例(nginx.cong/config文件/模块代码文件), 经过实验证明,可以编译成功。
Nginx
Nginx的内部结构是由核心部分和一系列的功能模块所组成。核心部分实现了底层的通讯协议,为其他模块和nginx进程构建了基本 的运行环境,并且构建了其他各模块的协作基础。除此之外,应用相关的功能都是在功能模块中实现的。(引自tengine)
那如何开发一个HTTP模块?
首先,需要把程序嵌入到Nginx中,即最终编译出的二进制程序Nginx要包含我们的代码。(编写config文件)
其次,这个全新的HTTP模块要能介入到HTTP请求的处理流程中。 这里涉及到HTTP模块的调用方式。最典型的HTTP模块调用方式是通过配置文件的location块决定了匹配某种URI
请求将会由相应的HTTP模块处理。因此,运行时HTTP框架会在接收完毕HTTP请求的头部后,将请求的URI与配置文件的所有location块进行比较。匹配后根据location{}内的配置项选择HTTP模块来调用。
满足这两个前提后,才能开始处理HTTP请求。
下面是nginx.conf配置文件使用mytest模块处理请求的示例。
worker_processes  1;

error_log  logs/error.log;
pid        logs/nginx.pid;

events {
    worker_connections  1024;
}

http {
    include       mime.types;
    default_type  application/octet-stream;

    log_format  main  '$remote_addr - $remote_user [$time_local] "$request" '
                      '$status $body_bytes_sent "$http_referer" '
                      '"$http_user_agent" "$http_x_forwarded_for"';

    access_log  logs/access.log  main;

    sendfile        on;

    keepalive_timeout  65;
    server {
        listen       80;
        server_name  localhost;
        access_log  logs/host.access.log;

        ##自己开发的nginx http模块mytest 处理请求
        location /gsm{
            mytest;
        }

        location / {
            root   html;
            index  index.html index.htm;
        }
    }
}
1、 创建config文件
config定义三个变量
- ngx_add_name

- HTTP_MODULES

- NGX_ADDON_SRC config是一个可执行的SHELL脚本,用于通知Nginx如何编译自定义的HTTP模块. `ngx_add_name `指定了需要编译的模块名,`HTTP_MODULES` 保存所有的HTTP模块名称。每个HTTP模块间由空格符相连。因此在重新设置`HTTP_MODULES`变量时,不要直接覆盖它, 要像示例中设置。 `NGX_ADDON_SRC`指定新增模块的源代码,用于编译makefile阶段。
config文件示例
ngx_addon_name=ngx_http_mytest_module
HTTP_MODULES="$HTTP_MODULES ngx_http_mytest_module"
NGX_ADDON_SRCS="$NGX_ADDON_SRCS $ngx_addon_dir/ngx_http_mytest_module.c"
因此,只需要利用config文件重新编译nginx。 在执行configure命令时候,需要执行configure --add-module=PATH命令,PATH是我们自己的HTTP模块文件所在路径(ngx_http_mytest_module.c 和 config文件所在路径)。
这里简单说两句利用config文件编译自己模块的原理。首先,我们使用configure脚本将自己的HTTP模块加入到Nginx中。
在Nginx的configure脚本中auto/modules 脚本里创建了ngx_modules.c文件。
ngx_modules.c文件定义了
ngx_module_T *ngx_modules[]
ngx_modules[]数组非常重要,存储了Nginx的所有模块。Nginx在初始化,处理请求时,都会循环
访问ngx_modules[]数组,确定用哪一个模块处理。 HTTP_MODULES="$HTTP_MODULES ngx_http_mytest_module" 命令
就是将ngx_http_mytest_module加入到ngx_modules[]数组中。
通过编译,最后在makefile阶段生成obj/Makefile 和 objs/ngx_modules.c
2、编写模块文件
Nginx的模块需要使用C(C++)语言编写代码来实现,每个模块都要有自己的名字。这里我们命名为 ngx_http_mytest_module.c.
编写一个HTTP模块的几个步骤:
-
step1. 编写模块结构
ngx_http_mytest_module这个是模块结构,其中起的作用是:
- 定义了模块的上下文结构(step2)
- 定义了模块命令结构(step3)
-
step2. 编写模块上下文结构
ngx_http_mytest_module_ctx由于nginx有很多种模块,如事件模块,HTTP模块等,每个模块都有自己的特性,而ctx将会指向特定类型模块的公共接口。 即注册为某一类模块。例如,在HTTP模块中,ctx的类型需要定义为
ngx_http_module_t结构体。ctx定义了:nginx在触发了模块运行的时候,如何处理已经在其他http,server,location定义过的上下文
-
step3. 编写模块命令结构
ngx_http_mytest_commandscommands数组用于定义模块的配置文件参数,以及设置出现mytest配置项后的解析方法由哪个回调方法(ngx_http_mytest)担当。
-
step4 出现配置项后触发的回调函数
ngx_http_mytest这个回调函数中可以设置对http请求的具体处理方法,
ngx_http_mytest_handler -
step5 对http请求的具体处理方法
ngx_http_mytest_handler这个方法的参数中可以获取http请求结构,并且可以设置http返回
至此,一个http模块就可以完成了。先贴出源代码文件(ngx_http_mytest_module.c)示例。
/*
* Copyright (C) gsm
*/
#include <ngx_config.h>
#include <ngx_core.h>
#include <ngx_http.h>
static ngx_int_t ngx_http_mytest_handler(ngx_http_request_t *r);
static char *
ngx_http_mytest(ngx_conf_t *cf, ngx_command_t *cmd, void *conf);
static ngx_command_t ngx_http_mytest_commands[] = {
{
ngx_string("mytest"),
NGX_HTTP_MAIN_CONF|NGX_HTTP_SRV_CONF|NGX_HTTP_LOC_CONF|NGX_HTTP_LMT_CONF|NGX_CONF_NOARGS,
ngx_http_mytest,
NGX_HTTP_LOC_CONF_OFFSET,
0,
NULL
},
ngx_null_command
};
static ngx_http_module_t ngx_http_mytest_module_ctx = {
NULL,
NULL,
NULL,
NULL,
NULL,
NULL,
NULL,
NULL
};
ngx_module_t ngx_http_mytest_module = {
NGX_MODULE_V1,
&ngx_http_mytest_module_ctx,
ngx_http_mytest_commands,
NGX_HTTP_MODULE,
NULL,
NULL,
NULL,
NULL,
NULL,
NULL,
NULL,
NGX_MODULE_V1_PADDING
};
static char *
ngx_http_mytest(ngx_conf_t *cf, ngx_command_t *cmd, void *conf)
{
ngx_http_core_loc_conf_t *clcf;
clcf = ngx_http_conf_get_module_loc_conf(cf, ngx_http_core_module);
clcf->handler = ngx_http_mytest_handler;
return NGX_CONF_OK;
}
static ngx_int_t ngx_http_mytest_handler(ngx_http_request_t *r)
{
if (!(r->method & (NGX_HTTP_GET | NGX_HTTP_HEAD))) {
return NGX_HTTP_NOT_ALLOWED;
}
ngx_int_t rc = ngx_http_discard_request_body(r);
if (rc != NGX_OK) {
return rc;
}
ngx_str_t type = ngx_string("text/plain");
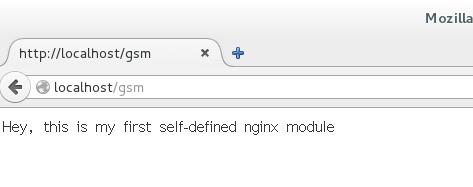
ngx_str_t response = ngx_string("Hey, this is my first self-defined nginx module");
r->headers_out.status = NGX_HTTP_OK;
r->headers_out.content_length_n = response.len;
r->headers_out.content_type = type;
rc = ngx_http_send_header(r);
if (rc == NGX_ERROR || rc > NGX_OK || r->header_only) {
return rc;
}
ngx_buf_t *b;
b = ngx_create_temp_buf(r->pool, response.len);
if (b == NULL) {
return NGX_HTTP_INTERNAL_SERVER_ERROR;
}
ngx_memcpy(b->pos, response.data, response.len);
b->last = b->pos + response.len;
b->last_buf = 1;
ngx_chain_t out;
out.buf = b;
out.next = NULL;
return ngx_http_output_filter(r, &out);
}
2.1 handler方法
可以发现司机处理http请求的是ngx_http_mytest_handler方法。
ngx_int_t (*ngx_http_handler_pt) (ngx_http_request_t *r)
方法的返回值是:
- HTTP响应包的返回码(200,404…)
- Nginx全局定义的错误码
Nginx会根据返回码构造响应包给用户。
我们知道HTTP请求由三部分组成,分别是:请求行,消息报头,请求正文。
而HTTP请求的所有信息都可以从handler方法的ngx_http_request_t类型的参数r中获得。
例如,获取HTTPrequest消息报头的代码
r->headers_in
获取HTTP请求正文的方法要复杂一点。由于请求正文比较大,如果试图一次性调用并读取完所有的包体,那么多半会
阻塞Nginx进程。HTTP框架提供了一种方法来异步的接收请求正文:ngx_http_read_client_request_body()。如果不想处理请求
中的请求正文,那么可以调用ngx_http_discarded_request_body_handler()方法将接收自客户端的HTTP请求正文丢弃掉。
对于HTTP响应报文,也是由三个部分组成。分别是:状态行、消息报头、响应正文。
消息报头由ngx_http_send_header方法发送。
ngx_int_t ngx_http_send_header(ngx_http_request_t r)
仍然只需要对输入参数r设置就可以发送响应消息报头。例如,
r->headers_out.status = NGX_HTTP_OK;
对于响应正文,如果是内存中的字符串作为响应正文发送,HTTP框架提供ngx_http_out_filter方法。
ngx_int_t ngx_http_output_filter(ngx_http_request_t *r, ngx_chain_t *in)
之所以需要参数ngx_chain_t *in 是因为Nginx实现的是流式的输出,不用等整个响应体都生成了,才往客户端发送数据。而是
产生了一部分内容就将其组织成链表,调用ngx_int_t ngx_http_output_filter发送。
因为要发送响应正文,那么就需要分配一块内存存储响应报文,以便发送。
为了高效地控制内存,Nginx提供了内存池分配内存,减少内存碎片。同样在handler方法的输入ngx_http_requestg_t类型
参数r中,可以使用r->pool内存池。
    struct ngx_http_request_s{
    ...
    ngx_pool_t *pool;
    ...
}
HTTP框架提供了ngx_create_temp_buf(r->pool, 128)方法分配内存。
3. 实验
-
mkdir一个文件夹,将源代码文件(
ngx_http_mytest_module.c)全部放到一个目录下(/home/gsm/ngixdev/module), 同时 在该目录中编写一个config文件用于通知Nginx如何编译本模块。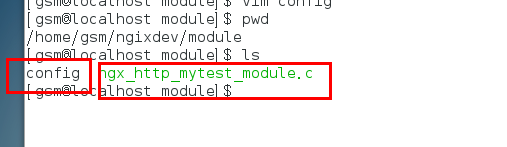
-
在configure文件夹,输入configure命令,编译

-
输入make
-
输入make install
-
重启nginx.conf
-
结果
参考
- 深入理解Nginx 陶辉[著] 出版社: 机械工业出版社